How many of you have small, sentimental objects tucked away in drawers or closets? Maybe you have saved your grandfather’s pocket watch, a bowtie from a special occasion, a baby bracelet, your child’s favorite toy….the possibilities are endless. It’s time to pull those out! You can create simple, personalized art that will make you smile each time you glance at it. I mentioned in my last post that I think it is important to fill your home with accessories that are meaningful to you. It is extra special when those accessories tell a story, and I have a story to share with you.
Back in 2006:

Almost a dozen years ago, we were boating on a local lake when we came across a cabin for sale that had this fantastic tree swing on the beach. It would swing clear out over the water. We were completely drawn in and pulled our boat up for a closer look. The friendly owner was out front and asked us to come in and take a tour. We anchored the boat, waded to shore, and fell in love. Within days, we had claimed it as ours. Look how little our babies were!


Okay…now that you have taken in their 2006 cuteness, I can move on. 🙂
Our cabin has been a truly magical place for us and an undeniable blessing. I have thanked God over and over for allowing it to become a part of our lives when it did. Absolutely nothing can compare to the days and nights we have spent there with family and friends we love, away from the distractions of everyday life. As our children have gotten busier over the years with all of their activities, the little bits of time at 16 North Cove have become that much more precious.
Fast forward to 2013. My husband popped by the cabin one day in March. When he stepped inside, his jaw dropped. The interior was covered from floor to ceiling in black mold. Our pilot light had blown out, a pipe had frozen and broken, and then some unusually warm weather had caused the mold to bloom. We were devastated. Every “soft” item had to be discarded, and it took more than two years to start over from pretty much the ground up. That meant almost three whole summers of no cabin, but look at it now!
Today:

We have A LOT to do to really feel settled inside. There are no window treatments, only the bare minimum for bedding and a lot of blank walls. I plan to share our improvements with you as we make them. Today I am going to share just a couple little art projects that might inspire you. Here is what I started with. In case you can’t tell, those are shadow box frames from Hobby Lobby. They allow you to frame objects with dimension.

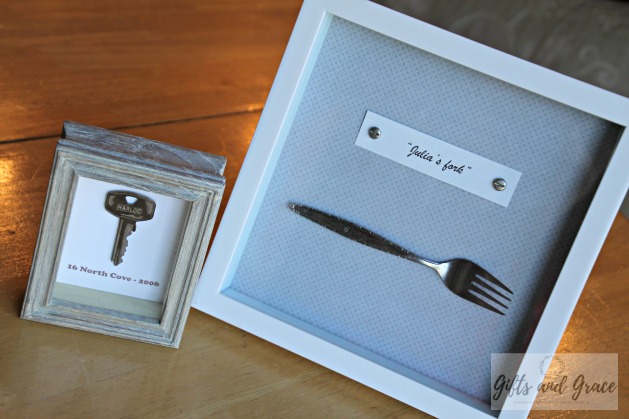
When we were at the cabin this weekend, we came across two items that we had saved from “the mold”…..the key to our original cabin and a special fork. If you look at the fork closely, you can see the rose pattern embossed on it.

Our daughter, Julia, was so IN LOVE with that fork when we first bought our cabin. It was just her size and pretty. She threw a FIT if someone else used it. (Remember she was only 2 at the time. Thank goodness she doesn’t throw fits like that anymore!) Now we just laugh about it. When I saw the fork, I thought, “I need to frame that!” Then my artistic niece Baylie suggested that I also frame our original key. Great idea!! So this is how I did it.
Framing the fork:

I took the back out of the shadow box frame and then traced its shape onto my piece of scrapbook paper and cut it to size. Next, I painted a thin layer of Mod Podge on the inside of the frame back and placed my paper over that, gently smoothing it out. You can see the two little bumps where the easel attached to the back, so I decided to cover those with my “title.”

I used my Publisher program on my computer to create a title for my art and printed it out on white scrapbook paper. Any Word program would work great, too! My title was attached over the little bumps with glue dots, but there was something missing. (I promise you will see all of this in my photo of the finished product in a minute.) I had two decorative brads; however, there was no way to push those through the wooden back without drilling holes, so I simply cut off the metal “wings” and hot glued those on each end of my title.

Now for the key:
I absolutely LOVE how worn our original key is because it has developed this beautiful mixed metal patina. I used my Publisher program again to create a background with our cabin address and the year it was established. Then I used the glass as a template to cut that to size so that I could see where the lettering lined up.

I simply hot glued that piece of paper to the inside of the frame back, hot glued my key just above the address and put it all back together. SUPER SIMPLE!! I am in love with it. Thanks for the idea, Baylie!!
My finished art projects:
Aren’t they FUN? Honestly, I could not get a photo that did them justice.


Now I just need to find a home for them, but I know “Julia’s fork” will end up in our happy cabin kitchen somewhere. Here is a peek into our Memorial Day morning there. I tried my first recipe from the Magnolia Table cookbook. Joanna’s biscuits and gravy recipe was a HIT!!!

Come visit our cabin sometime! We love having company. Just don’t use Julia’s fork!! 😉
I get completely giddy when I hear from any of you. Please let me know if you find any special items to frame, and don’t forget to subscribe to my email list to receive my new posts as I write them. Happy summer! God bless!
Betty
I’m often lucky and blessed to be the grandma-in-residence on the magical weekends when the stars align and we all can gather. Just call me GB, everyone does. You’ll usually will find me by that farmhouse sink cooking. The cabin holds a special place in my heart too. I even wrote about it on my blog, http://www.bettystreff.com. Maybe later this summer I’ll share my story about it with you here.
The time you spend with family and friends is to be cherished. Life zips by in a blink and you will never regret laying something else aside to bask in the presence of loved ones. Happy summer, God bless!
Karen Carlson
Oh, we love GB time at the cabin and all of the good food that comes with it! You have taught me to soak it all in, momma. Thank you.
Liz
Love this idea and the story behind it, Karen. Thanks for sharing!!
Karen Carlson
Thank you so much, Liz! I really appreciate you taking the time to read it. Keep me posted if you create any little framed projects! 🙂
Sonya McLeod
Really cute ideas! I hold dear the memories I have of visiting your original cabin. It was so relaxing.
Karen Carlson
Thank you! I have yet to have a girls’ weekend since our cabin was resurrected. I need to do that!
Esmeralda Johnson
What a great idea! I have some many things I can do. My first thought was my Holy Communion Bible & Rosary. They currently reside in my bedside table. I get teary thinking about how I can “Honor” it now. Thank you! P.S. We have that pattern on some over our silverware. My Grandma gifted it to us 22 years ago when we got married. ❤️
Karen Carlson
I love your idea! I like the thought of “honoring” what those items stand for.
How funny that you have that silverware pattern!?! This was a little random fork that came with our fully-furnished cabin. Julia just claimed it as her own. 🙂 Thanks for sharing that with me!