
YEARS ago, I pinned an image of a DIY dry erase board from Better Homes and Gardens. Also years ago (almost a dozen!), we purchased a cabin on a lake near here that came fully furnished. You would not believe all of the fun, colorful accessories we inherited! One such item was a great big tropical print that no longer works with our cabin decor. But, oh, I had plans for it!!
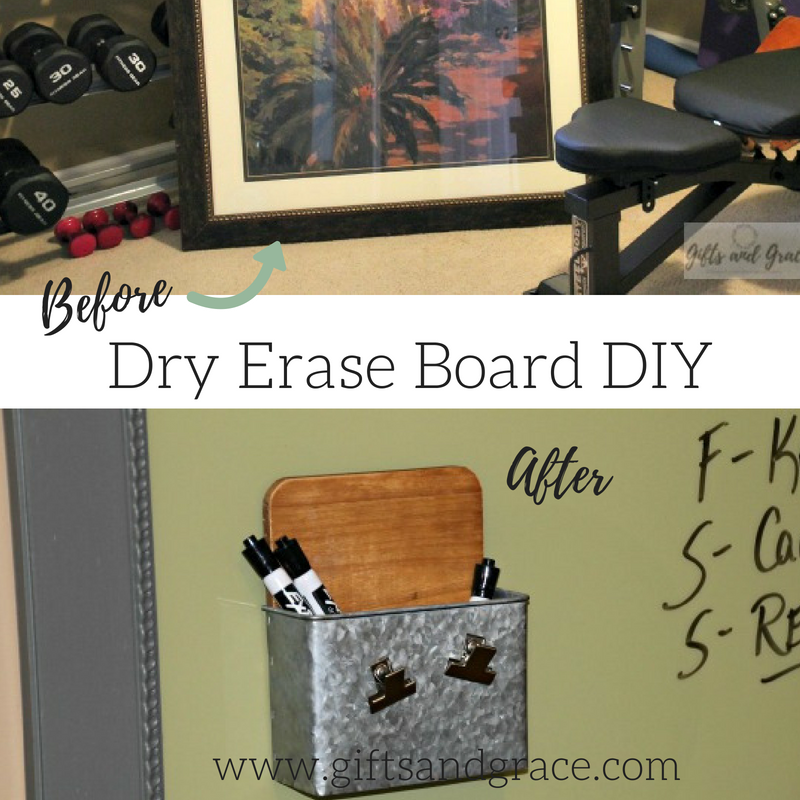
It sat in our storage for a LONG time and then has been sitting in our workout room while I figured out the details (In other words…..PROCRASTINATED.) My husband has been stashing away extra cash to upgrade his weight equipment. Once the new equipment went in a few weeks ago, I decided it was time for a room refresh and that I was FINALLY ready to do something with that print. Here it is in all of its BEFORE glory:
BEFORE:

The obvious first step was to pull everything apart by removing the back as well as the glass from the frame. I took the frame outside and used some fairly coarse sandpaper to rough it up to help the paint adhere. I honestly think a light to medium weight would have been better, but all is fine.


It is always amazing what paint can do, and this was no exception. Sherwin Williams is my go-to paint store. They are always extremely helpful, and I am in love with their high-quality paint. Great paint makes all the difference. A quick peek through my sample deck led me to Grizzle Gray #7068…..a nice warm, light charcoal color. The Sherwin Williams employee suggested that I use their Pro Classic Smooth Enamel Finish for Trim and Doors. It has a nice satin finish and will hold up very well to any bumps and scuffs. I only bought a quart, and I could probably do about 10 more frames with what I have left….seriously!!

A trim brush was perfect for this part of the project simply because of all of the molding details which a roller could not handle, and I am not a huge fan of spray paint (thinking I need more practice!) You can probably tell by my brush that it has been used A LOT. I have actually painted almost every room in my house in the past couple of years! Believe it or not, one coat pretty much did the trick, but I did go over most of it with a second.

While my frame was drying, I attached pieces of sheet metal to one end of my cardboard backing with hot glue. I picked these up at Menards for about $11 total. I also used packing tape to soften the edges and to make sure that those things stayed put! You will see why I did this in a minute, I promise. 🙂


To create the dry erase board surface, you simply paint one side of your glass with a light color of paint. This will become the back of the glass when you put it back in the frame, and you will write on the other side. I used paint I already had on hand….also from Sherwin Williams, of course. The color is Bamboo Shoot #7733, and the product is their Pro Mar 200 Interior Latex. A small roller cover with a 1/4″ nap gave the paint a beautiful smooth finish. (Notice my also-very-used roller.) I gave the glass a good four or five coats, allowing them to dry in between. A QUICK PAINT TIP: If you don’t have any liners on hand, use inexpensive tin foil to line your paint tray for easy cleaning.


All that was left to do was put everything back together and add a couple of final touches. The glass went back into the frame with the painted side in. Then I put my cardboard backing on so that the metal strips ran horizontally across the top, pressed against the glass. Now that part of my dry erase board is magnetic!! (Be careful not to scratch your paint.)
I found a great container at Hobby Lobby to hold my dry erase board markers and eraser cloths. It was on sale for $5! I decided to hot glue that baby right to the front of the glass. I think it is stinkin’ cute!! My last little details were these great brushed gold clips from Chip and Joanna’s collection at Target. The large ones have a strong enough magnet to reach that metal through the glass and five layers of paint, but I think I am going to order some extra strong little magnets to glue onto the back of these so that I can use all of them and give them a little more oomph.


I created that fun little printable for y’all to use in your workout rooms to help you remember who’s got your back when you feel like quitting. 🙂 Use the Download Here button below to have it delivered straight to your device. Use the fit-to-page option when you print it. It can also be printed in poster format at your local print shop.
I have to confess that as I was adjusting my finished product on the wall IT FELL DOWN, AND THE FRAME BROKE. My hook I was hanging it on had bent, and the board slid right off. Praise the good Lord the glass did not shatter. I had a little gluing, clamping, bracketing and touch-up painting to do (with extra hands from my mother-in-law and my hubby,) but one would never know if I had not told you.
And that’s it! Here is our new dry erase board in all of its AFTER glory. I love it!!
AFTER:


We can use it to track our progress, design workout plans or to encourage each other. It also adds a nice, large shot of color to the space. I have to be honest, I have fallen off the wagon lately with my workouts. I am praying that this will give me a little extra incentive to spend some time in that room!
Let me know what you think and don’t forget to subscribe to my email list to receive all of my newest posts.
Here’s to getting fit! God bless.
Mom
Very clever! If only a room refresh would incent me to get fit! That might take a stick of dynamite!! LOL
Karen Carlson
Thanks! Ha! Maybe it is wishful thinking. 🙂
Shelly
Very cute and inspiring! I just read a few of your posts and am amazed at your creativity! Love your blog. ????
Karen Carlson
Thank you so much, Shelly!! It means a lot to me that you enjoyed my posts. I sincerely appreciate you taking the time to read them. 🙂
Judy
So talented!
Karen Carlson
Thanks, Judy! I don’t know about that, but I am having a lot of fun with this. 🙂