“Her children rise up and call her blessed…”
Proverbs 31:28
Mother’s Day is just around the corner. Our high school always holds our graduation ceremony on this beautiful holiday. One by one the graduates present their mothers with a single flower. I think it is a perfect gesture of love and respect for all that those mommas have done to raise up their children and send them on their way. I don’t think there is a dry eye in the gym at that moment.
My own mother owned a gift store for many years. I was lucky enough to work there all the way through college and as a young married woman. If you looked up the words “selfless,” “generous,” or “helpful,” my mother’s picture would be right there. She gives from every cell of her body. She taught us that we were to treat every single person who walked through the door of that store (or into our lives for that matter) as if they were hurting in some way.
One way we spoiled our customers was by wrapping the special gifts that they chose for others with some fantastic packaging. I think we were in on the ground floor of the gift bag trend in the 80’s and 90’s! I am not sure which was bigger…the tissue paper spilling out of the bag or MY HAIR! My favorite way, however, to wrap our customers’ gifts was with simple gable boxes. I still love them. They are the perfect size for a million things, and there are so many fun ways to get creative with them! And the best part….they are only 99 cents at Hobby Lobby (or less if you are a smart coupon shopper!) They are sold flat. You just have to pop them up! Here are seven fun ideas you can use to treat your momma to something special this Mother’s Day.
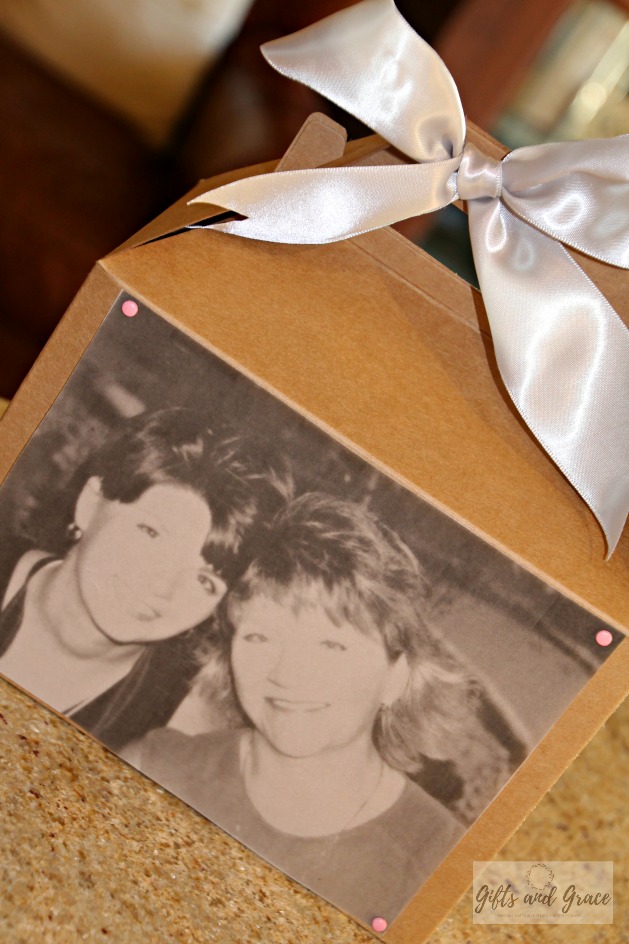
1. Use a favorite photo.

This is one of my favorite photos of my mom and me from almost 15 years ago. I printed it in black and white on vellum paper and attached it with little pink brads to add a subtle bit of color. 5×7 is the absolute perfect size. You could even attach any 5×7 photo with some sticky dots to make it easily removable and ready to frame! I hot glued the grey ribbon to the front of the box handle so that it does not need to be untied to open the box. Slick!
2. Polka dot it!


This idea is so simple that you could get your kiddos to do it! Just use a little craft paint and a couple sizes of round sponges to add paint to your box, or let them go crazy with any pattern. Hand prints would also be super cute! While the paint is still wet, sprinkle a little glitter onto your design to add some shimmer. I always think it is fun to create a tag to coordinate with the wrapping. I glued a small white ribbon bow to a clothespin to clip the tag to the box.
3. Say it with chalk.

I painted the front of this box with basic black craft paint….not special chalkboard paint. The chalk marker still worked perfectly. There are other sizes of chalk markers. Pretend you are a kid again drawing on the sidewalk! Have fun with some art! I hot glued a little trim to the top edge of the box then wrapped the same trim around just the front handle….so that, again, it was easy to open and close the box without undoing everything. I hope the chalkboard trend doesn’t go away soon. I am still crazy about it!!
4. Use washi tape and pom poms.


I used some good old washi tape and then used a round paper punch to cut the circles. I thought they were perfect with the pom poms that I had made with the Clover pom pom makers. I have several sizes of these and have used them to make pom poms for my cake toppers and lots of gift wrapping. The pom poms take me back to my roller skating days as a kid. I had big bright orange and red homemade pom poms tied to my skates (but I digress.) One of the best gift wrapping tips I learned from our gift store wrapping was to slip a little twist tie into the back of your ribbons and bows, or in this case, pom poms. It makes it so easy to twist these onto a gift box or bag. How many times have you seen someone struggle to untie the ribbon to get to the good stuff inside!?! AWKWARD!
5. Use burlap ribbon and twine.

It is pretty simple to see what was done with this one. The 5.5 inch rolls of burlap ribbon are the perfect width to wrap around these gable boxes. Another one of my favorite things to do is to add a little silk flower to packages with hot glue. Check for sales on bouquets of silk flowers, pop off the blooms and store them in little baggies with your supplies. Great alternative to a bow!
6. Use a napkin!


All of the ideas up to this point have only taken 5-10 minutes tops to create. This one took a little longer…maybe 20, but I think it is SO BEAUTIFUL! I have seen this technique done on Easter eggs, so I thought…why not use it for this? I cut a napkin into little squares and used Mod Podge to attach them to the box one by one, giving them a top coat as I added them. It was easy and fun and honestly good for the soul to create a little piece of artwork. You could use almost anything….pretty tissue paper, old greeting cards, scrapbook paper, gift wrap scraps…you name it!! I loved the little gold foil touch on this napkin, so I used gold ribbon on the gift to play that up.
7. Download my designs. 🙂


Using the DOWNLOAD NOW button below, you can have these designs that I created sent straight to you for FREE! The two designs come on one page. I printed mine on a nice cream card stock, cut around the edges and attached it to the front of the gift box with gold brads. Then I painted a little Mod Podge onto the flowers and sprinkled a little glitter on that area. PLEASE send me pics if you use them to create a special gift package. I can’t wait to see what you do!
Well….that’s all for now. My mind is still coming up with ideas. Another day. Believe it or not, except for the boxes themselves, I created every single one of these packages with supplies I had on hand. I DID NOT BUY ONE OTHER THING. I have quite a few basic craft supplies and I stash away every little piece of ribbon and anything I think would make a great embellishment. I would encourage you to do the same if you haven’t already. Take yourself back to summer camp or art class and create something special for your momma just like you did then. Then fill your box with some perfume, great concert tickets or a few cupcakes. She will LOVE it all!!
BTW….I am dying to know which of these seven ideas is your favorite. Please comment below. 🙂
Happy Mother’s Day and God bless.
Esmeralda Johnson
Karen – I love these. My favorite is the picture box. The chalk is a close second. Great ideas!
Karen Carlson
Hey, girly! Thank you! The photo box is my fave, too. (But I probably had the most fun making the one with the napkin collage!)
Judy
I like them all! If I had to choose I’m partial to photos so probably the first one.
Karen Carlson
Thanks, Judy! I am totally with ya. I am crazy about photos…old and new.:)
Marissa Clark
They are all great but #4 was my favorite!! Thanks for sharing your fabulous yet simple idea! ☺
Karen Carlson
Thanks for the pom pom and washi tape love! Two of my favorite things:)
Sandi Marker
Very cute Karen! I am digging those pompoms right now. So fun. I remember making them as a kid. I am an advocate for never throwing away things. You never know when it will come in handy for some project. Enjoying your blog!
Karen Carlson
Thanks so much, Sandi! I am guessing I would drool over your craft supplies! Maybe we need to make some softball bag poms!
Bambi Van Horn
The one with the pom poms!
Karen Carlson
Love it! It is so fun to hear what people like! Thank you. 🙂
Mom
I love the burlap! There’s just something about the texture that appeals to my senses.
Karen Carlson
Yep! It looks like you!!! Thanks, momma!! 🙂
Matt Chell
Very good ideas!
Karen Carlson
Thanks so much, Matt! And thanks for reading. 🙂