Let’s talk cake! I LOVE cake! I am all about eating healthy and limiting sugar….BUT….an occasional splurge is heavenly.
I took a cake decorating class in the back recesses of Hobby Lobby YEARS ago. You should see some of the pics of my first attempts. Oh my. Sometime I may just have to pull those out for you! I have had fun learning and experimenting over time. I want to share an awesome secret with you from that class. This little nugget is a gem…if I had only learned this one thing, I would have gotten more than my money’s worth! Here it is….a paper towel is your FRIEND! Just look at what it can create. Isn’t the texture on this cake beautiful?

So how did I get here? Let’s start with a few basics. This particular cake is three layers of yum. I use boxed cake mixes; because, they are inexpensive, simple and honestly taste fantastic. It is important to have a nice foundation for your icing. It is SOOOO much easier to ice a cake when your cake is nice and even and releases from your pan beautifully. I like to use Crisco or butter to grease my pans. I then add some flour to the pan and shake it around to coat everything evenly. Another great trick when you have a flat bottomed cake pan is to cut a piece of wax or parchment paper to line the bottom. This photo shows all three steps of the process.

The next step is just to get a nice layer of icing on the outside of your cake. It does not need to be smooth to start the process, but it does need to be as even as possible and fairly thick for the paper towel to be able to work its magic. I use Wilton’s basic buttercream icing recipe:

I doubled the recipe for this triple layer cake. I have used butter, Crisco, buttery Crisco, or a mixture of these, and they all taste great. I have also used butter, vanilla and almond flavoring. The possibilities are really endless. This is how this cake started.

Now you need to wait….probably 10 or 15 minutes to allow the icing to dry just a tad. This is an incredibly simple technique. Lay a paper towel on one section of the cake with the indented side down. Then lightly rub the back of it to press the design into the icing. If your paper towel sticks and takes some of the icing with it when you remove it, it is not ready. Let it set up for just a few more minutes and try again. That is it!!! Just keep moving the paper towel around to different sections until you have done the whole cake. This is the fun design I used this time. I promise you that you will NEVER look at paper towel patterns the same way again!!!


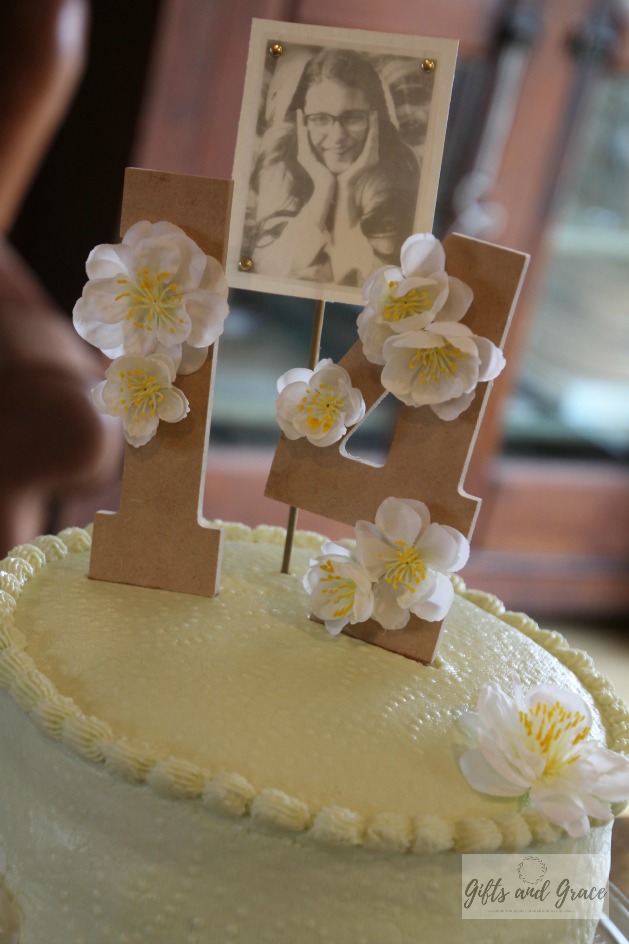
To finish this cake off, I just used the classic shell technique around the top and bottom edges. Then I got to do my favorite part…..the cake toppers!! My daughter just turned 14 a couple of weeks ago, so I made a special little cake for her. I will share that in a bit. Her sweet friend Hattie requested a cake like Julia’s for her birthday yesterday. I happily agreed to make one for her!!!
One of Hattie’s favorite colors is mint green, so that is where I started. Then I decided to make some pretty toppers. I had a wonderful photo of her that I had taken when we did a little photo shoot with some of Julia’s friends last fall. I cropped it and printed it on vellum in black and white.. I LOVE printing on vellum. You can put any color of cardstock paper behind it, but I decided to back this photo with white. I attached the vellum photo to the cardstock with 4 little gold brads to add a little sparkle. I also found some great wooden numbers at Hobby Lobby. They were only $1.49 each! I bought a floral stem and popped the flowers off, cut the back of the flowers off a bit so that they were flat and hot glued them onto the numbers. Then I hot glued a wooden skewer to the back of both numbers and the photo. Done.


And here is the final result!!!

As promised….I will share a couple of photos from my daughters birthday. Her cake was inspired by some gold glittered numbers and these napkins that she picked out to start.

We found yarn to match and made some little pom poms (using an awesome Clover brand pom pom making tool…there are a lot of different sizes) which we slid onto wooden skewers. Then we tied some thin gold ribbon on the skewers to coordinate with the numbers. IMPORTANT SIDE NOTE: Yarn is quite FLAMMABLE!!! Remove the pom poms before you light candles! (Speaking from experience here people.) Here is my happy girl and her cake.


I hope I have inspired you to get a little creative. Just a few simple personalized touches can really make someone you love feel extra special. Just have some fun (and start looking for fun paper towel designs!!!) I would love to see pictures of what you create. Let’s connect soon!
God bless!
mama
Ooooh……????????
????????Ahhhhhh.
………hoooooO????????
????????………hhhhhhA
Karen Carlson
You are silly, momma. 🙂
Karen Carlson
Thank you! I hope you do. Creativity is good for the soul. 🙂
Traci
Love it, Karen!!! So pretty! I too took one of those Hobby Lobby cake decorating classes (actually the whole series ????????♀️) so much fun.
Love your posts, keep them coming ❤️
Blessings!
Karen Carlson
Thanks, Traci! Weren’t those classes fun?!? Thanks for reading! 🙂
Michelle Widger
What an awesome idea! Thanks for sharing.
Karen Carlson
Thank you! I would love to hear back if you give it a try. 🙂